
Architecture should be working on improving the environment of people in their homes, in their places of work, and in their places of recreation. It should be functional and pleasant, not just in the image of the architect's ego.
- Norma Merrick Sklarek
As you develop Drawings for a new home, be sure that you consider what you want based on the way you live. Before deciding on a design, make a list of those features you find most valuable to your own style of living. (Read the "Home Plan Questionnaire" at the end of this article.) There is no standard procedure for arranging your ideas: your approach will reflect the unique circumstances surrounding your home life and characteristics of your site.
A good starting point might be rough sketches of a Floor Plan, the most fundamental element in a set of Drawings. Many basic decisions are made while considering a Floor Plan such as site orientation, room layout, wall placement, door types and swings, window types and sizes, electrical and plumbing fixtures, cabinets, and trim package. These are not firm decisions, only a way to TEASE ideas onto paper and begin to arrange your thoughts.
A floor plan is a road map of your lifestyle. It's a top view, drawn to scale, showing all the interior features. You'll find that all designers use architectural symbols, which are standard icons, to represent objects that appear in your home. Bath tubs, showers, sinks, and appliances are all represented by symbols. There are standardized acronyms that also appear on the Drawings but these aren't your main concern. Your concern should not be how to create Drawings…your concern should be defining your lifestyle so you get the home style you need.
There are several ways to acquire a home design. One way is to purchase Stock Drawings from a plan book bought through a mail order service. Another way is to retain the services of an Architect or Designer to produce a custom design. A final way would be to note a house in a local neighborhood then contact the General Contractor to replicate a similar house on your lot. A variation on any of these approaches may prove successful; for instance, develop your rough sketches, find a similar stock plan then hire a Residential Designer to assist in changes to fit your requirements.
No matter what method you use to acquire a home design, the main point to remember is that this is a creative process. Most Designers consider themselves to be Artists. Their personal style will dictate how the Drawings are rendered and assembled.
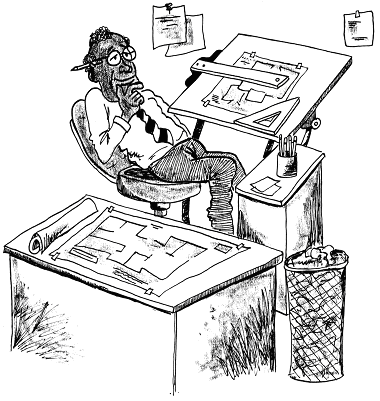
Rather than suggest one method of acquiring a home design over another, it may be best to consider what all Drawings have in common. All Drawings are created through a design process from Schematics, to Design Development, to Contract Documents, to Bid/Negotiations, through Construction Observation. Whether the Drawings are stock or original design, there are universal elements common to all Drawings.
A complete set of Drawings will include these universal elements:
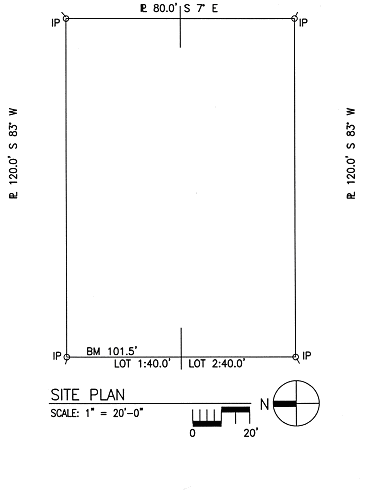
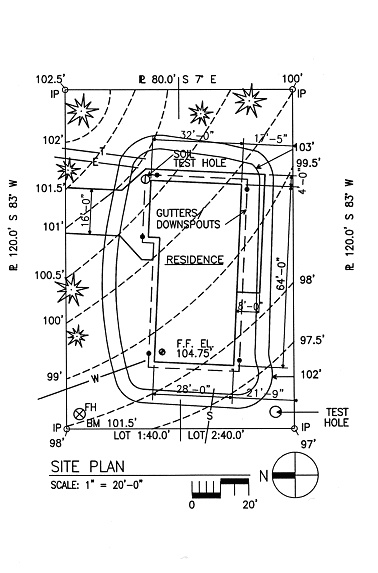
Site Plan. This bird's eye view of your site shows the lot boundaries, the structures on the lot, any existing features, and the compass direction. It should also indicate any required setbacks and topography contours.
Foundation Plan. This drawing shows layout and dimensions of slab-on-grade, basement or crawlspace walls depending on what best fits your site plan. It indicates how the underpinning structure of your house is supported by the earth below it.
Floor Plan. This drawing shows the room layout of your home. It's the most user-friendly page of the Drawings because it indicates room use, doors, windows, fixtures, cabinets and built-ins. Most of the construction details originate from the room layout of your home.
Framing Plan. This drawing is an oversimplified floor plan showing just the walls. Besides that, the joists, trusses and beams are usually depicted so the structural aspect of the building is revealed.
Roof Plan. This drawing is a top view of the entire roof system, including ridges, hips, valleys, rakes and eaves. It may also indicate where gutters and downspouts are located.
Mechanical Plan. This drawing is an oversimplified floor plan showing the location of electrical, plumbing and HVAC details. If the house is complicated, a different sheet is dedicated to each trade specialty separately.
Elevations. This drawing shows the front, side and rear exteriors of the house. This drawing of the house provides a flat, straight-on view so you can see the siding, windows, doors, and the entire outside of the building from ground floor to roof ridge.
Cross-sections. This drawing shows all the hidden details of the house by cutting an imaginary line through the middle of the structure so the interior of the walls, floors, ceilings and roof can be examined. This view shows all the major elements of your house's construction.
Details. This drawing highlights specific areas of construction where details need to be shown in order for the building crew to join together the structure. Specific areas, such as foundation connections, door assemblies, and window installations, are presented in greater detail.
Schedule. This chart appears on the drawings, listing doors, windows, fixtures, and hardware. Under each category, there's an indication as to where each item is located within the building, accompanied by the manufacturer's make, model, and size.
Every life and home style is unique. The Design/Build process itself will have its own special conditions. A set of Drawings will assume the unique characteristics of your situation and the Architect/Designer's approach so the document's sequence may not appear exactly as just described; however, to be complete and correct, all elements should appear.
Of course, the best way to familiarize yourself with the details of your project is to follow the Design/Build Matrix from the very beginning.
However, if you choose a Stock Drawing from a plan book, you've eliminated Schematic and Design Development activities which are important to familiarizing yourself with the many variables which contribute to how the Drawings are created. If you choose a Stock Drawing, your first contact with your design will occur during preparations to submit for a Building Permit. If this is the case, proceed cautiously while reviewing the Drawings and creating Specifications for the design. Major alterations to your design after Drawings are approved by the Building Department can be costly and difficult.
After your Drawings are returned from the Building Department, there will be two official sets: one for the Field Inspector and the other for the Owner. The official set should never leave your files; use extra copies of Drawings to circulate among Trade Contractors and Suppliers for bid proposals; watch for any changes by the Building Department on Drawings.
Remember: Look over the whole set of Drawings as you seek proposals from Trade Contractors before beginning the job. Take notes about points that seem unusual or in need of extra study. Be sure that door, window, electric, plumbing, HVAC (Heating, Venting, and Air Conditioning) and trim package Specifications conform to Drawings. Every piece of material, product, or equipment should appear in respective Trade Contractor's proposal.
Regardless how complete a set of Drawings should appear, ambiguities will manifest themselves on the job, as the Trade Contractors proceed with their work. Too often, Drawings are so crammed and cluttered that Trade Contractors miss information and misread them when preparing bid proposals. The only way to avoid this type of problem is to become very familiar with all aspects of your design and review layout and details with each Trade Contractor during Bid/Negotiations before work begins. As time consuming as this may seem, every competent General Contractor invests this time and effort in preparing for a construction project in order to avoid material and monetary losses.
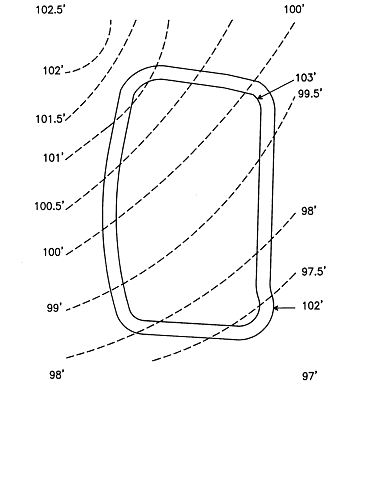
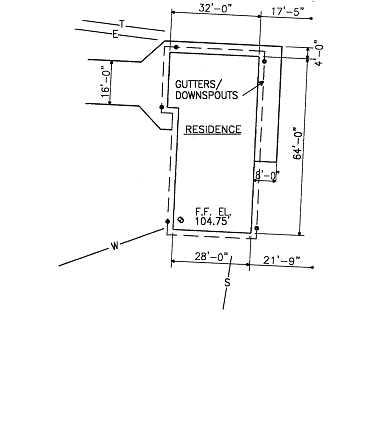
The following sequence of pictures is a set of overlays which in combination depict a typical Site Plan. The overlays are provided to illustrate how one might "read" information symbolized on a set of Drawings by separating the layers of information.
On the first overlay, information pertaining to a legal survey is presented. A "North" Arrow, Dimension Scale, and Property Lines indicate bearing and length of boundaries. The "IP" symbol shows the location of an "Iron Pipe" at each corner of the building lot. The "BM" symbol provides a "Bench Mark" elevation in the lower corner of the building lot.
On the second overlay, there's a graphic representation of the raw land with the location of the largest trees, fire hydrant ("FH"), and several test holes which were dug on site in preparation for construction work. In this case, the fire hydrant becomes the fixed point on which the "Bench Mark" elevation has been established for future use.

On the third overlay, a topographical profile describes current and future contours of the landscape around the house. The dotted line represents the current contour, and the solid line represents the future contour after the home is completed. The contour elevations are established in relation to the "Bench Mark" elevation taken from the top hub of the fire hydrant.
On the fourth overlay, an outline of the house and driveway indicate their location on site. Overall dimensions are also provided, and the gutter and downspouts are represented by a series of dashes and dots around the house perimeter. The "F.F.EI." symbol gives the "Finish Floor Elevation" in relation to the "Bench Mark" established on site. Access for utilities are indicated by "T" for "telephone," "E" for "electrical," "W" for "water," and "S" for "sewer."
The final picture depicts the Site Plan's "layered effect."
There's only one way to learn how to "read" construction Drawings: study, study, study. As you immerse yourself in the details of your project, the lines, dimensions, objects, and symbols will gradually begin to hold meaning. There's no short-cut.
Remember: Your role is to define a homestyle which matches your living pattern and unique site characteristics. Ideally, every design will be created individually, and an appropriate response developed for each situation.
Your first impulse may be to memorize the icons and mimic the drawing techniques of the design profession. Resist this impulse. There's no need to purchase design software or drafting equipment for doing just one house. Architects, Designers, and Plan services are ready to offer this technology to you but you can't go to them empty handed. Your job is to DEFINE how you intend to live and CHARACTERIZE the best place in which to do it.
Let's consider the principal element of a design: the floor plan. An enormous amount of thought and coordination must go into the floor plan so rely on your instincts and allow the design to gradually evolve (See "Design/Build Collage" in the PUNCH LIST article.). Take advantage of the "layered effect" by grouping your ideas on separate sheets of paper without worrying about how they might go together. Rest assured: your mind has the capability of self-organizing, a natural means of comprehending the unified whole, which will eventually bring together the disparate pieces.
Ask yourself: "How will I approach the house?" Your response to this question will raise issues relating to car garage, parking, pedestrian pathways, deck, front door, vestibule, and foyer.
Next question: "How will I arrange the living spaces?" Your response to this question will raise issues relating to floor levels, stairways, activity areas, privacy, public centers, and family functions.
Now consider: "How will the interior/exterior relate to one another?" Your response to this question will raise issues relating to windows, doors, views, sounds, roof, climate, geographic factors, topography, and vegetation.
HOME PLAN QUESTIONNAIRE
*About the Owner:
- Who are the family members and their ages?
- Are there any special needs regarding accessibility?
- Where does your family spend the most time together?
- Where does your family eat meals together?
- Does your family enjoy any hobbies together, or do you engage in family activities in separate areas?
- How do you entertain?
- How important are formal living areas to you?
- How do you plan to use your yard?
- MOST IMPORTANT: What amount of money did you pre-qualify with your construction lender, and are you using this dollar figure as the basis for proceeding in the Design/Build process?
*About the property:
- What are the dimensions?
- What is the topography?
- Are there any special features, such as views, water, trees, adjacent property, steep slope, historic preservation, and home association?
- Are there any owner requirements, such as driveway access, parking, ramps, rockeries, outdoor living areas, decks and patios?
- Is the utility infrastructure available to the building site, such as water, power, gas, sewage, cable, and storm water?
- Does the site buildable according to the standards of the agency having jurisdiction over the issuance of building permits?
*About the house:
- What is the anticipated square footage of heated/cooled space?
- What is the preferred architectural style?
- How many levels in the house?
- If two-story, where will the staircases be located? How many?
- Will there be a full or daylight basement?
- What are the preferred exterior materials and color?
- What are the preferred window and door styles?
- How many garages in the house? Attached or detached?
- Are there any special garage requirements, such as workshop, storage, hobby area, heated or cooled?
- What are the number and location of bedrooms?
- What are the number and location of bathrooms?
- Are there any special room requirements, such as hobby or office?
- In which rooms to you want fireplaces?
- Where is the preferred laundry location?
- MOST IMPORTANT: Are you doing budget-based designing?
*About room requirements:
- Describe the foyer: size; style; ceiling height?
- Describe the living room: location; formal or informal; use; furniture; special features; ceiling height?
- Describe the dining room: location; formal or informal; use; furniture; special features; ceiling height?
- Describe the kitchen:
- Will the kitchen be used for serious meal preparation or for quick, convenient meals?
- Is this where you'll eat most family meals?
- Do you want a breakfast counter with stools?
- Where do you prefer your work area?
- Describe the type of appliances you prefer?
- What are your material choices for counters? Floors? Cabinets?
- Do you want a desk in or near the kitchen?
- Do you want a walk-in pantry?
- Will there be an outdoor eating area adjacent to the kitchen?
- Describe the family room: location; entertainment area; fireplace; furniture; wet bar; furniture; special features; ceiling height?
- Describe the study or home office: location; formal or informal; use; furniture; special features; ceiling height?
- Describe the bedrooms: location; formal or informal; use; furniture; special features; ceiling height?
- Describe the bathrooms: location; formal or informal; use; furniture; special features; ceiling height?
The adage "form follows function" will generally hold true. By responding to these questions and preparing rough sketches and a Design/Build collage, the Architect, Designer, or Plan Service has a basis for understanding your needs.
A final word: Collaborate with a professional to better understand your Drawings!
|


